
Motorcycle maintenance, DIY motorcycle maintenance, Motorcycle Chain
Chain Adjustment Guide: Improve Your Motorcycle Performance
Jul
Chain Adjustment Guide: Is your motorcycle not performing at its best? Many riders overlook a simple yet crucial aspect of bike maintenance: proper chain adjustment. A well-adjusted chain can significantly enhance your motorcycle performance. However, many don’t know how to check or adjust it effectively.
This guide will walk you through everything you need to know about chain adjustment. You’ll learn why it matters, the tools required, and the steps to do it yourself. Whether you’re a beginner or an experienced rider, understanding chain adjustment can elevate your riding experience. Let’s dive in and explore how to keep your motorcycle running smoothly.
Mastering Chain Adjustment: A Comprehensive Guide to Improve Your Motorcycle Performance
Chain Adjustment Guide: Proper chain adjustment is crucial for maximizing your motorcycle’s performance, influencing key factors such as handling, safety, and the longevity of your bike’s components. Understanding chain tension and its specifications set forth by the manufacturer can prevent significant issues down the line. An improperly adjusted chain can lead to adverse effects, including excessive wear on both the chain and sprockets, compromised safety, and even performance degradation.
Correct chain slack is vital; chains that are either overly tight or too loose can adversely affect your bike’s handling. An overly tight chain can cause undue stress on the engine and other components, while a loose chain can lead to a loss of power transfer and increase the risk of the chain falling off. Regularly checking for signs that adjustment is needed, such as unusual noises or excessive chain movement, can save motorcyclists from frustrating breakdowns.
Chain Adjustment Guide: To properly adjust your chain, you’ll need a few essential tools: spanners, a socket wrench, a torque wrench, and a ruler or chain slack gauge. Safety precautions are paramount, so ensure you position your motorcycle correctly using a center stand, paddock stand, or side stand as specified by the manufacturer. Identifying the chain adjustment marks is also essential to guide your adjustments accurately.
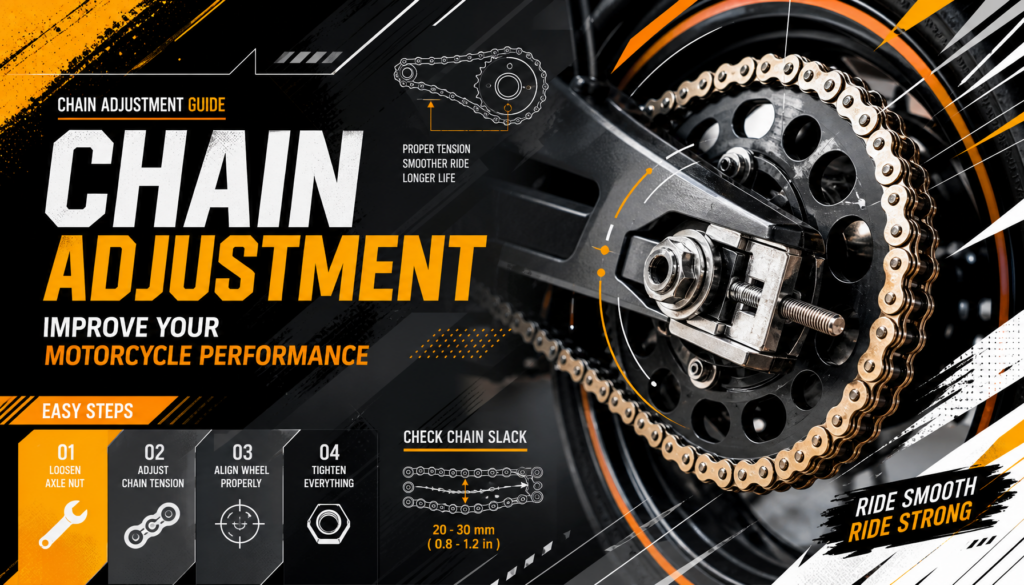
Once you have your tools ready and your motorcycle properly positioned, the adjustment process can begin. Start by loosening the rear axle nut and then adjusting the chain tension evenly on both sides. Ensure that the rear wheel is aligned correctly, as misalignment can cause uneven wear on the tire and chain. After adjusting, tighten the axle nut to the recommended torque and recheck the chain slack to confirm a proper fit.
Regular inspection and maintenance of your motorcycle’s chain can help prolong its life. This includes checking for chain wear and elongation, inspecting the sprocket condition, and cleaning and lubricating the chain when necessary. Understanding when to replace the chain and sprockets, rather than merely adjusting, is vital for maintaining peak motorcycle performance.
Understanding Chain Tension: The Key to Performance
Chain Adjustment Guide: Understanding chain tension is crucial for maintaining your motorcycle’s performance. The correct chain slack ensures optimal power transfer from the engine to the rear wheel, which directly affects your bike’s responsiveness and handling. If the chain is either too tight or too loose, it can lead to significant issues such as premature wear of the chain and sprockets, compromised safety, and decreased performance.
Most manufacturers provide specific chain slack specifications that should be followed to ensure proper adjustment. Typically, the recommended slack is between 1 to 2 inches, but this can vary based on the motorcycle model. Consulting your owner’s manual or manufacturer guidelines is essential to know your bike’s exact requirements.
Chain Adjustment Guide: When the chain is too tight, it can put excessive strain on the gearbox, leading to early failure. Conversely, a loose chain can derail or cause slippage, resulting in a loss of control while riding. Besides performance issues, an improperly adjusted chain can cause increased noise and vibrations, often felt through the bike during rides. It’s crucial to address these problems promptly to maintain a safe riding experience.
There are several signs that may indicate your motorcycle needs a chain adjustment. If you notice abnormal sounds when riding, such as clanking or rattling, or if you experience any unusual vibrations, these could be warning signs. Additionally, if you see that the chain has visible slack or is not aligned properly, it’s time to take action. Regular maintenance checks can help catch these issues early, preventing potential damage and ensuring your motorcycle runs smoothly.
To sum it up, keeping your chain tension at the manufacturer-recommended specifications is vital for your motorcycle’s longevity and performance. Regular inspections and timely adjustments can help you avoid costly repairs and enjoy a safer, more efficient ride.
Essential Tools and Preparation for Chain Adjustment
Chain Adjustment Guide: When it comes to chain adjustment, having the right tools and preparation is crucial to ensure your motorcycle performs at its best. First off, you will need a few essential tools: a set of spanners, a socket wrench, a torque wrench, and a ruler or chain slack gauge. These tools will help you accurately measure and adjust the chain tension according to your motorcycle’s specifications.
Before you start the adjustment process, it’s important to prioritize safety. Make sure to wear appropriate protective gear, including gloves and safety glasses. Additionally, prepare your workspace by ensuring it is clean and free from hazards. Ensure the motorcycle is stable and secure during the adjustment, as a tipping motorcycle can lead to accidents.
Chain Adjustment Guide: Positioning the motorcycle correctly is also essential. Depending on what you have available, use a centre stand, paddock stand, or simply a side stand to lift the rear wheel off the ground, making it easier to manipulate the chain. With the motorcycle stable, locate the chain adjustment marks on the swingarm; they provide visual indicators to help guide your adjustments.
Following these preparatory steps not only ensures a safer working environment but also leads to a more effective chain adjustment. Having the proper tools and understanding how to position your motorcycle will set you on the right path to achieving the correct chain tension. Remember, an improperly adjusted chain can lead to detrimental effects on your motorcycle’s performance, including wear and tear on the chain and sprockets. Therefore, investing time in preparation is key to a successful maintenance routine. Start gathering your tools and prepare your motorcycle, so you can keep your ride smooth and efficient.
Step-by-Step Chain Adjustment Process
Chain Adjustment Guide: Adjusting your motorcycle’s chain is a crucial maintenance task that can significantly affect its performance and longevity. To start, gather your spanners, socket wrench, torque wrench, and a ruler or chain slack gauge. Ensure your motorcycle is safely positioned using a centre stand, paddock stand, or the side stand as necessary.
Begin the chain adjustment process by loosening the rear axle nut. This step is essential as it allows you to adjust the tension of the chain without forcing it. Once the nut is loose, check the existing chain slack to understand how much adjustment is needed.
Chain Adjustment Guide: Next, adjust the chain tension evenly on both sides, ensuring that you are within the manufacturer-recommended specifications for slack. An overly tight or loose chain can lead to poor performance or even damage the motorcycle. Use the chain adjustment marks for accurate alignment and adjustment on both sides of the axle.
After adjusting, it’s important to align the rear wheel correctly. Misalignment can lead to uneven wear on the tires and chain, causing further issues down the line. Once aligned, securely tighten the rear axle nut to the manufacturer’s recommended torque. This applied torque will keep the axle in place, ensuring your adjustments hold.
Finally, always recheck the chain slack after tightening the axle nut. This simple step ensures that everything is correctly adjusted and safe for your next ride. Regular maintenance, including periodic chain adjustments, helps to prolong the life of your motorcycle and improve overall performance.
Understanding how to properly adjust your chain will not only enhance your riding experience but also ensure your motorcycle operates smoothly. Don’t neglect this essential maintenance task!
Inspection and Maintenance: Keeping Your Chain in Top Shape
Chain Adjustment Guide: Regular inspection and maintenance of your motorcycle’s chain is crucial for ensuring optimal performance and longevity. One of the first things to check is chain wear and elongation. Over time, your chain can stretch, leading to inefficient power transfer, increased wear on sprockets, and potential safety hazards. Make it a habit to monitor the chain regularly, especially if you notice any symptoms of wear.
Additionally, inspecting the sprocket condition is essential. Worn or damaged sprockets can exacerbate chain wear and lead to poor performance. Look for signs of teeth wear or deformities that might indicate it’s time for a replacement.
Cleaning and lubricating the chain are also critical maintenance tasks. Dirt, grime, and debris can accumulate, impacting the chain’s ability to function smoothly. Utilize a quality chain cleaner and a suitable lubricant to ensure the chain operates efficiently. A well-lubricated chain not only performs better but can also extend its lifespan significantly.
Chain Adjustment Guide: Another key aspect of chain maintenance is identifying damaged or stiff links. These can contribute to uneven tension and reduce the overall effectiveness of your drive system. If you notice any stiffness or visible damage, it’s time to address these issues before they lead to more serious problems.
Incorporating these inspection and maintenance steps into your routine can greatly enhance your motorcycle’s performance. Ensure you’re familiar with the manufacturer-recommended specifications for chain and sprocket condition. This knowledge can guide you in making accurate adjustments and replacements as needed. By being proactive, you can avoid costly repairs down the line and enjoy a safer, smoother ride.
Common Mistakes and Troubleshooting Chain Adjustment
Chain Adjustment Guide: When adjusting the chain on your motorcycle, there are common pitfalls that can impede performance and safety. One frequent mistake is over-tightening the chain, which can lead to premature wear of both the chain and sprockets. Thus, always ensure that you follow the manufacturer-recommended specifications for chain slack as specified in your owner’s manual.
Another issue to keep an eye out for is a misaligned rear wheel. This can cause uneven wear on the chain, making your motorcycle less responsive. To diagnose this, check the alignment marks on both sides of the swingarm before making adjustments.
Chain Adjustment Guide: Ignoring torque specifications when tightening the rear axle nut is also a common error. Using a torque wrench is essential—this tool helps ensure that the nut is tightened to the correct level, preventing potential damage to the motorcycle components. Relying solely on hand strength can lead to over or under-tightening.
If you’re experiencing unusual chain noise, vibrations, or uneven wear, these can provide critical clues about your chain’s condition. Noise can indicate that the chain is too loose or that it has stiff links, while vibrations are often a symptom of alignment issues. Make sure to inspect for any damaged links and consider cleaning or lubricating the chain to enhance performance.
Lastly, know when to replace the chain and sprockets instead of merely adjusting them. Signs such as severe elongation or visible damage are indicators that the components have reached the end of their lifecycle and require replacement.
Frequently Asked Questions
How often should I perform chain adjustments?
The frequency of chain adjustments depends on several factors, including the type of motorcycle and riding conditions. Generally, it is recommended to check the chain tension every 500 to 1,000 miles or after long rides. Regular inspections help maintain optimal performance and extend the life of your motorcycle’s chain.
What are the signs of chain damage?
Common signs of chain damage include unusual noises while riding, stiff links, and excessive chain slack or tightness. If you notice uneven wear patterns on the chain or sprockets, it’s crucial to inspect the components immediately and perform necessary adjustments to avoid further damage.
What tools do I need for chain adjustment?
Essential tools for adjusting your motorcycle chain include a spanner, socket wrench, torque wrench, and a ruler or chain slack gauge. Having the right tools ensures you can make precise adjustments while maintaining safety throughout the process.
What are some maintenance tips for motorcycle chains?
To keep your motorcycle chain in top condition, regularly clean and lubricate it. Pay attention to wear and elongation during inspections, and check the condition of the sprockets as well. This preventive maintenance drastically reduces the risk of unexpected breakdowns and enhances your riding experience.
What common mistakes should I avoid?
When adjusting your motorcycle chain, be cautious of over-tightening or under-tightening the chain. Misalignment of the rear wheel can cause increased wear and handling issues. Always follow the manufacturer’s torque specifications, and if you hear unusual noises or notice vibrations, it may indicate more serious issues that need addressing.
Should You Adjust Your Chain? Our Verdict on Motorcycle Maintenance
Chain Adjustment Guide: Maintaining your motorcycle’s chain is crucial for ensuring optimal performance and safety on the road. Chain adjustment is an important aspect of this maintenance, as the correct tension not only affects how smoothly your bike operates but also promotes longevity of the chain and sprockets.
One of the primary indicators that your chain may need adjustment is incorrect slack. Manufacturer-recommended specifications will vary, so it’s essential to refer to your motorcycle’s manual. An overly tight chain can lead to excessive wear and potential damage to the transmission, while a loose chain can result in slippage, which can be dangerous. Regularly checking the tension will help you pinpoint when adjustments are necessary.
In addition, using the right tools is vital for an effective adjustment. You will need spanners, a socket wrench, a torque wrench, and a ruler or chain slack gauge. Always ensure that your motorcycle is positioned correctly—whether on a centre stand, paddock stand, or side stand—to make the process safer and easier. Familiarizing yourself with the chain adjustment marks can also streamline your efforts.
Chain Adjustment Guide: Once you gather your tools, follow a step-by-step process for chain adjustment. This includes loosening the rear axle nut, adjusting the chain tension evenly on both sides, and aligning the rear wheel. After making these adjustments, don’t forget to tighten the axle nut to the manufacturer’s recommended torque and recheck the chain slack to ensure optimal tension.
Inspecting your motorcycle’s chain doesn’t stop at adjustment. Regularly checking for wear, elongation, and condition of the sprockets is vital. Cleaning and lubricating the chain will also enhance its lifespan and performance. By taking these steps, you will not only maintain your motorcycle effectively but also ensure your rides are as safe and enjoyable as possible.
We at Speedzone specialize in offering top-quality servicing for a variety of premium motorcycle brands. Whether you ride a Yamaha, Honda, KTM, Suzuki, Kawasaki, SYM, Aprilia, Piaggio, or Mutt Motorcycle, you can trust us to keep your ride running smoothly.
Book Your Service Today
Ready to give your motorcycle the care it deserves? Or just curious to know more? With our premium motorcycle accessories available catering to every motorbike models. Book your motorcycle servicing with us or drop by our showroom today and experience the difference of expert servicing tailored to your brand and friendly staffs!
